 |
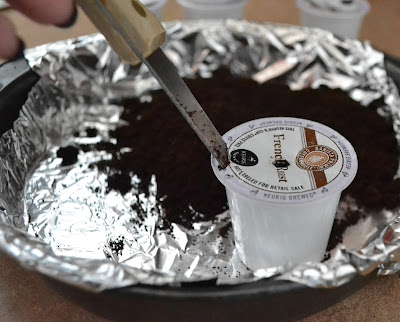
| Be careful when taking the top off the K-cup. |
First you need to make some coffee. This may seem obvious
but the grounds must be used rather than fresh out of the can. If you use a
regular 12-cup coffee brewer, your life will be made easier during this
process. If you are like me and use a Keurig brewer or any other single cup
brewer then things will get tedious. Remember: this is for the good of your
plants so don’t give up.
 |
| The dried grounds right before going into the garden. |
The second step can be done while you’re brewing your java.
Get a small pan, I used an eight-inch round cake pan, and line it with aluminum
foil. Simple enough.
The third step is up to you on how you do this. For those
with the easy 12-cup brewer, just wait for the grounds to cool off a bit then
dump the grounds, sans the filter, into the aluminum foil covered pan.
For those of you with a single-cup brewer, this is where
things start to suck. Like with the 12-cup brewer, let the small cup with the
grounds cool a bit so you don’t scorch yourself. After, you have to take a
knife, don’t use a butter knife or you’re more of a risk to your counters, and
cut the top of the cup containing the grounds. Because I use K-cups, I pierce
along the edge and circle my way around until the top comes right off. Then
just dump the grounds into the pan. The not so great part is usually the
grounds get stuck in the small cup so just use your knife to scrape the bottom
and sides.
One thing worth noting about using single-cup brewers is it
may be worth it to let a few cups pile up before you empty them. Believe it or
not, there is a surprising amount of grounds in one K-cup so five or six will
give you enough grounds for a garden the size of mine.
The fourth step is preheating your oven to 250 degrees
Fahrenheit. It may seem weird but you have to dry the grounds out before
putting them to work in your garden.
The fifth thing is baking them for 15-20 minutes. If you
have a good layer of grounds then you might want to leave them in for a bit
longer and if you have a small amount then keep them in for less time. Once
they’re done, let them cool for at least a half hour.
The final step in the process is sprinkling the grounds into
your garden. I’m not saying hold a handful over top of the plants and sprinkle
the ground like Parmesan over spaghetti. Hold your hand down close to the soil
and spread it around.
See? Not so bad or complicated. For me, it’s
something I do once a week or every other week when I have the time, and brainpower
to remember what I was doing, and I feel like it’s helped with keeping my soil
and plants healthy.
No comments:
Post a Comment