Showing posts with label gardening. Show all posts

Sunday, July 12, 2015

Adventures in gardening: reflecting on efficiency and poor decisions

     My garden is borderline out of control.
     I’m not saying I’m not proud of the little raised bed box garden but I am slowly becoming intimidated by its’ size. In previous posts I’ve mentioned feeding, watering and composting as a way to keep the garden healthy and thriving.
     It’s thriving all right.
Things have gotten a bit out of hand.
     Coffee grounds, eggshells and Miracle Grow along with the garden hose have acted like an IV by providing nutrients galore to my bunching onions, chives, garlic, sage, basil and tomato plants. I’ve watched these little guys go from nursery school (see what I did there?) to out of control but delicious in a month’s time.
     As stated before, I’ve cut some of my basil to make basil infused olive oil, which will be done next week. A recent development is my chives and green onions are amazing. One of the coolest feelings is deciding you want to throw something extra into a dish and all you have to do is walk outside with a pair of scissors to cut some herbs from your garden. If there is one reason why a home garden is a good idea it is to have the satisfaction of changing a recipe on a whim because you suddenly want some chives in your mashed potatoes, much like I did the other night. Another fun thing was when I made coq au vin for the first time and instead of buying green onions while at the store I just wiggled some out of my garden.
Some of the roma tomatoes. Please note: I had to
lift some branches/leaves and bend down to find these.
     I feel so earth friendly and kitchen efficient.
     So let’s take a moment to talk about the poor decisions. As you can tell from my photos, my tomato plants are the definition of thriving. I have a rather large tomato, which is a bit bigger than a baseball, surrounded by a few more tomatoes on the celebrity plant and have quite a few romas coming in. Here’s the problem: I don’t know how many romas are hanging around because the branches and leaves of the five tomato plants all together have become so entwined I feel like a conquistador tromping through the Amazon. I know of at least six romas but there are so many blossoms in hidden places so I may have to wait for the tomatoes to turn red before I find them. The issue with waiting to spy them due to the color change is I don’t want them to start rotting on the vine because they’ve been left too long.
The huge celebrity tomato next to some of its' kin.
     The other poor decision is my onions. They were labeled as bunching onions and there were three to five of them in each quarter section of the pack. I bought two packs because I happen to love onions and after some research I found out bunching onions was another name for green onions. When I planted them, me being me, I didn’t think much about placing them from the quarter section right to the soil without breaking them up and planting them separately. What I’m admitting to is having three to five onions that should have bee spaced apart right on top of each other a total of eight times. It’s not affecting the growth so much as it’s incredibly difficult to pull the onions from the soil without pulling out a sibling that is still growing. Live and learn.
     Another issue has arisen: the beetles have landed.
     Just yesterday I flicked three off my tomato plants and glared as one flew by. Japanese beetles have been the one thing I haven’t figured out how to prevent other than using some kind of netting around my garden. I’m not sure if these little jerks are a problem everywhere but every summer our plants are swarmed with them at some point. Last year I even made a sport out of walking outside every half hour to shake the potted plants and watch at least 10-15 go flying. I admittedly also took pleasure in squashing them.
     I’m not ashamed.
     I’ve also been seeing more weeds pop up but they are still super small. Fun fact though: I stated before I thought the amount of weeds was because I have the garden in a raised bed and therefore nothing from the ground can come up. One of my mother’s tomato plants, which she keeps in a pot, had a huge weed coming right up from the middle of the pot. So I guess that blows my theory.
     To sum it all up the honeymoon period is over and in this marriage of college student and garden, we’ve moved into a fix-it-upper and it’s over-run by insects, covered in foliage and the only thing that works is the coffee brewer.
     Hopefully the next post will have a tomato or two off the vine.

Thursday, July 9, 2015

Making things from the garden: basil infused olive oil

     There are times when I fancy myself an “accomplished” cook and by accomplished I mean
haven’t given anyone food poisoning…yet.
     I like to try new things, most of which are found in the middle of the night when I have nothing else but Googling to do, and I have had few fails. That being said, I’ve found there are a few things I cook with frequently.
     Butter, because it makes everything taste like a delicious heart attack waiting to happen and keeps things from sticking to the pans.
     Garlic, because I love the taste and find reasons to sneak it into any recipe.
     Olive oil, because it gives a great flavor when roasting chicken or cooking some sides
     The butter and garlic are fairly straightforward ingredients. Yes, you can alter them but that takes serious effort and they come with short life spans. Olive oil though? It’s like the old Ronco ShowtimeRotisserie Oven’s, “Set it and forget it!”
     I like basil but unfortunately don’t cook with too much. It adds a fresh flavor to dishes but it doesn’t always work with everything. One of my favorite things to cook is a roasted lemon, garlic and rosemary chicken. One of the steps in the prep process is to give the chicken a rub down with olive oil because it helps with browning the skin while roasting. I normally use a garlic olive oil but given I’ve recently began gardening, I have so much basil I don’t know what to do with it.
     Cue the olive oil!
     I like herb infused olive oil because it adds flavor that’s not overpowering but an all around great kick. Seeing as I have Google skills, a Mason jar, some extra virgin olive oil and more basil than an Italian bistro, I set to find out how to make my own basil infused oil.
     Warning: it’s super easy but not instantaneous.
     Step one is making sure you have clean basil. Whether you are buying from a store/farmers market or growing it in a raised bed like myself, it needs to be washed thoroughly before you do anything with it. As I cut my basil from the stalks I was putting it right into a colander, stems and all, in order to cut down on the amount of potential dishes I would have to deal with later. The other plus was once done with collecting basil, I was able to put the colander right into the sink and start rinsing any dirt and gross nature off the leaves.
     After a thorough cleansing, I put paper towel at the bottom of a container, began picking leaves off the stems and dropped them right into said container. Once the leaves were in the container, I covered them with another paper towel to dry them. One of the keys to the herb infused oil is the herbs must be dry. I discarded the paper towels and recovered the basil in a fresh towel to let them completely dry over night.
     The next day, I emptied the basil into a mortar and ground them with a pestle in order to bruise them. The recipe I was using had a hot and a cold method and seeing as the steps after combining the herbs and oil were the same, I’m going with the cold and less complicated route hence the reason I’m only bruising the basil. Once I was satisfied with their state I dropped them into the Mason jar and poured the olive oil over them.
     I left about a half inch from the top of the jar because I wanted to make sure I had enough room to shake the jar as instructed. After tightening the lid, the oil and basil has to sit for about two weeks with a good shake at least once a day.
     That’s where I’m at right now. The two have been hanging out in the jar for about three days and once ready I’ll have to separate the oil and the basil via a strainer. I’ll likely bottle it and save it for my roasted chicken and turkey.
     This seems foolproof. If I fail, I need to sort out my priorities and reflect on why it turned out terrible.

Saturday, July 4, 2015

Adventures in gardening: getting resourceful and powerful


Amazing to see how much its grown in a month!
     Just a quick note to start, no matter if you are doing a photography blog and using your garden as a subject or not, everyone should take pictures periodically throughout their gardening process because you don’t realize how much its’ grown over such a short time.
     For the most part, the drainage situation isn’t affecting the tall plants. Seeing as I have yet to pull up any of my onions or garlic, I cant speak for their progress but they look fine from the upper half.
The two celebrity tomatoes growing side-by-side.
We’ve run into a minor problem. My tomatoes are a bit too close together and I know for next year to plant them spaced apart some more but here’s some of the main issues with their current location.
     As stated before, we’ve had some serious weather these passed few weeks. About a week ago there was a huge storm cell, as in “World News Tonight” did a segment warning people of the danger and tornado risk, and all the plants on our property were at risk.
A blossom on my celebrity tomato plant.
     The winds were nothing short of incredible and damaging. Luckily most of our plants were fine. We had some stargazer lilies fall over in our flower garden and some of the tomato plants suffered. At this stage, only one of my four roma tomato plants were bent and I fixed it by taking a wooden kebab skewer and a twist tie to return it to it’s correct position. A few days later, we dealt with a day of steady rain and relatively intense wind, which resulted in me using kebab skewers on the remaining three roma tomato plants. My celebrity tomato plant has faced the weather like a true champ.
     Other than the issue of falling all over each other and getting their leaves and branches all tangled, my tomato plants are doing well. My roma plants have started blossoming and I have two tomatoes growing on the celebrity plant with blossoms opening all around.
     As for the rest of the plants, they are getting a bit out of hand. I have to search a bit for my sage plant because the basil and tomato plants are hogging the attention. Because of the high amount of basil, I finally cut some off and I’m planning to make some basil infused olive oil. It’s funny because I cut quite a bit off and it looks like I didn’t even dent the plants. Anybody want some basil?
     In other maintenance news, I’m happy to report on the weed situation. I came into this knowing one of the worst parts of gardening is weeding but it’s a necessary evil. I accepted my fate but did so begrudgingly. I don’t know why, though I have theories, I don’t seem to have many weeds. I’m betting it’s because this is a raised bed garden and not plopped on the ground waiting to be invaded. The few weeds I have pulled out have been very, very small and I’m thinking they came from the containers the plants came in. It’s definitely making it easier to like gardening. If you’ve been avoiding trying your hand at gardening because you don’t want to deal with the upkeep then a raised bed is the perfect thing for you because you don’t have to worry about weeds been the nutrient leeches they are.
     I’m hoping by the next blog post I’ll be able to report one of my tomatoes was ready to come off the vine but I feel like it may be the post after. Both are doing fine at the moment but seeing as they are celebrity tomatoes they have to get quite a bit bigger before they are ready to be picked.

Monday, June 22, 2015

Adventures in gardening: draining, composting and nurturing

My tomato next to some open blossoms.
    Two weeks after the plants have found their new home in my raised bed, Mother Nature has found a way to partially ruin my fun.
     Nearly every day of the first week-and-a-half has featured rain either in the morning or a mass thunderstorm at night. Normally, I wouldn’t be so bothered about the amount of rain. Come to think of it, I would be jumping for joy knowing I didn’t have to venture into the sun in order to water the garden.
The buds on the top of the basil plant. Some of the flowers
along the bottom had already opened when I pinched them off.
     The reason I’m not exactly what you would call happy about the amount of precipitation we’ve received is my raised bed may or may not have a serious flaw. The instructions for the bed tell you to place the boards equally spaced apart and cut a few holes in the plastic lining in order to allow drainage. I noticed the second day that the water wasn’t draining. To solve the problem, I used a utility knife and slid it from one end to the other to open the plastic lining more to see if that would help.
     It hasn’t, or at least I don’t think it has.
The basil buds can be anywhere from a half inch
to two inches when you pinch them off the plant.
     Because of the rain, I haven’t been able to tell if the side-to-side slit in the lining has worked seeing as rain not only makes everything wet but also it has been too steady to make it clear whether or not the garden is draining. I’ve taken matters into my own hands or at least my dad’s. Instead of waiting around to see if the slit worked my dad grabbed a drill and put holes into each board (to be clear I didn’t ask him to do it, he just did it). It’s doing better but still not draining very well.
     Basic conclusion? Next year I won’t be putting a plastic lining down.
     Other than the mishap with the draining situation, the plants are growing better than I thought they would at two weeks. I’ve cut some chives on two separate occasions and I have a tomato the size of a large grape. I’m basically a proud mother of vegetables and herbs.
     I’ve also run into some of my first maintenance duties. Basil plants are great if you know the, as I call it, quirk about them. The tops of the plants will get buds that you must cut or pinch off before they bloom. Why? After they blossom they make the basil leaves turn bitter. On both of my basil plants this passed week I’ve had to remove the ends on nearly every stalk.
     As a final note, I’ve begun composting. Nothing too complicated seeing as I am nurturing a small garden and don’t want to overwhelm the plants. After I use eggs I wash the shells and keep them in a small round cake pan that I have lined with aluminum foil. Once I have enough I bake them at 250 degrees for about 15 minutes. The timing and temperature is nothing scientific and I’m sure anyone can do it differently because the whole purpose is to kill off any harmful bacteria. I crush them up as finely as possible and avoid stabbing myself with the sharp shells (warning: this will happen and this will hurt like a paper cut) then I sprinkle them into the garden.
     The other composting component is coffee grounds. This process would have been so much easier if we were trying this a few years ago seeing as we now only use a Keurig single cup brewer but the good news is there is a surprising amount of grounds in each little cup. Seriously, open one because I know you’re curious now.
     I use the same process with the grounds as I do the eggshells except the reason for baking them is to dry them out. I sprinkled the dried grounds into the garden with the help of my nephew and used the opportunity to teach him about healthy soil.
     Hopefully next week I will have pictures of multiple tomatoes to share.

Saturday, June 13, 2015

Adventures in gardening: planted, watered and sunbathed

Phase one: Complete

The raised bed before planting.
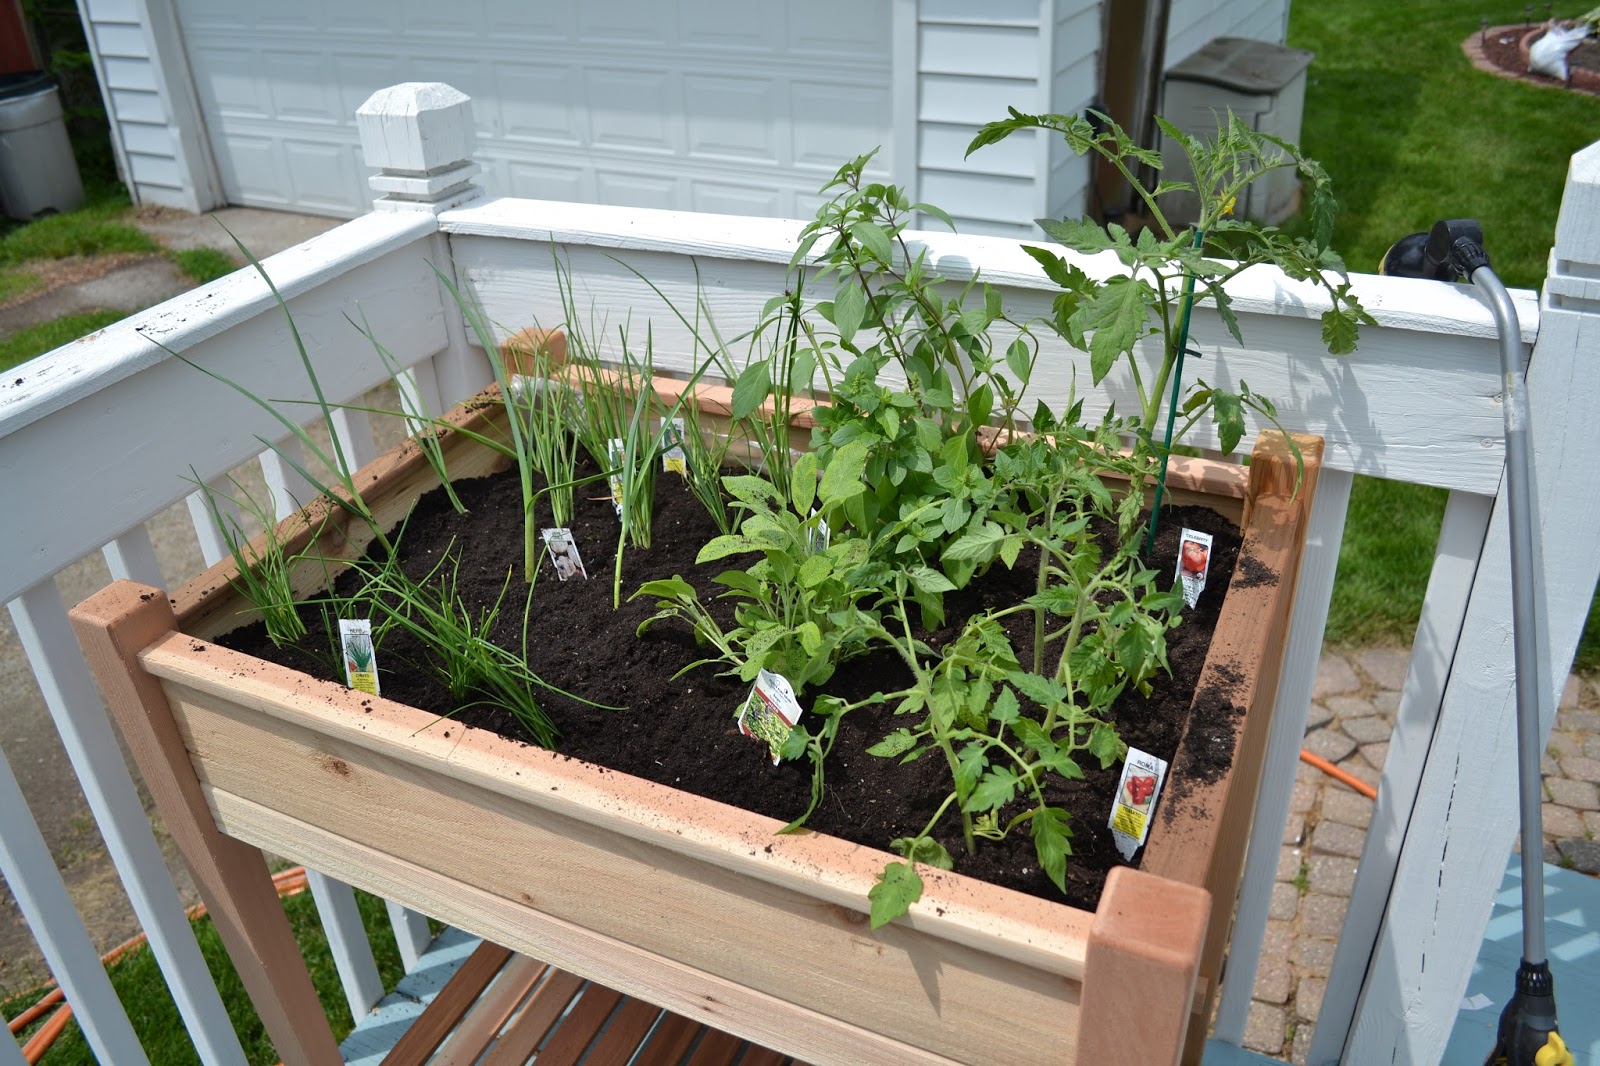
     Phase one, as I’m calling it, was getting the raised bed, the dirt, the plants and the planting process. I’ve spent the last few days looking into tips and tricks along with looking at what type of herbs and vegetables grow best in raised beds. The following is a step-by-step process of beginning with choosing the bed and ending with the plants soaking up Miracle Grow and the sun.
Step 1: The raised bed.
     My dad is very passionate about the backyard. I knew going into this that I couldn’t get a box garden that I would need to tear up part of the yard for, even if it were in the corner where he rarely goes, and the best option was a raised bed that could sit on our deck. We found one on Amazon.com and it arrived a few days later. Assembly wasn’t difficult though my dad, being the thinker he is, reinforced the boards that hold up the bottom of the bed. The bed also came with a plastic liner, which I’m sure will make cleanup in the fall so much easier, and I slit holes in the bottom to allow drainage in order to avoid root rot.
Two types of tomatoes, two types of basil, sage, garlic,
bunching onions and chives.
Step 2: What plants to invest in.
     I knew I wanted a tomato plant, preferably a roma or cherry, and I wanted basil. We already have both in my mother’s garden but as stated before sometimes you get a bad plant and things just fail no matter how much TLC you give it. I did my research and knew carrots would be stunted, cabbage gets too big, cucumbers expand and would have hang off the sides and green beans grow too tall. I made a list of the types of tomato plants I was after, stashed basil in my mind and decided I wanted green onions because I cook with them often.
Step 3: Tips.
While still in the containers, I began with
plotting out where to put each plant.
     I had heard of people using eggshells in their garden and wanted to know if it was worth it and what the possible benefits were. As it turns out, I’ll be saving eggshells to help with calcium and possibly as a slug deterrent. Also, I found out it would be best for larger plants to be planted on the north side of the bed so that they don’t over-shadow the smaller plants.
Step 4: Buy the plants.
Plants in the soil and labeled.
     I went to a local nursery with only three solid plants in mind and the rest I would wing. I grabbed a celebrity tomato plant, then some cinnamon basil and went on a search for roma tomatoes and green onions. I found the onions though they were labeled as bunching onions, found roma tomatoes and then I found what would take up the rest of the space. I grabbed garlic, sage, blue basil and chives. We cook with all of them frequently except the sage and that’s there for me to burn later (yeah, I’m one of those people).
Step 5: Planting.
     Gross will be the first word I would use to describe the planting process and it’s not because of the dirt. I hate the sun with a fiery burning passion. Where I set up my raised bed I was directly in the late morning sun. The upside was I chose to do this before we reached peak sun or else I would have some cherry-red tint to my Irish pale skin.
     The planting itself went well. I set the plants still in their little containers on the top of the soil before planting just so I would have a rough idea of how everything was going to fit. Once I had finished plotting everything out I started at the north end with the tomatoes and worked my way south. I kept a spare bag of soil next to me so I could add more as needed.
Step 6: Watering.
     A few days ago I bought a small container of liquid Miracle Grow. We’ve used it in the past mostly because a family friend who works in a greenhouse asked us if we fed and watered our plants. We had asked what the difference was and she advised we buy some Miracle Grow and mix it with water once a week to feed the plants. That year our plants thrived like never before. I poured the instructed amount into a watering can and filled it with water then poured it all over my new garden.
Step 7: Run out of the sun while the plants bath in it.
     As stated before I hate the sun and as soon as the plants were in the soil and watered I all but ran into the safety of my house and let the little guys in the garden bask in the warmth of the summer sun.
     There we have it. Phase one is done and we shall see what is to come with this garden. I’ll be watering and watching it and waiting for those pesky beetles and weeds to try and defeat me.
     Foreshadowing: They won’t win.

Friday, June 5, 2015

Coming soon: college student versus gardening

     One of the fun things about being on summer vacation is not having to rush to and from school. With all that free time, what should I do?
Spearmint in the herb garden.
     Start a garden!
     I've noticed an increasing interest in home gardening and people seem to get a real kick out of growing there own herbs and vegetables instead of making the trip to a grocery store. For the passed few years, my mother has kept an herb garden on our deck and I've learned some things about gardening.
Lavender in the herb garden.
     First, sometimes you just get a bad plant. Usually our basil plants have thrived to the point of not knowing what to do with all the basil leaves we cut off but last year the basil plant slumped. We hadn't done anything different from previous years either and in the past we've had difficulty with one or two plants out of the bunch. Sometimes it's really isn't you, it's them.
     Second, over/under watering. Feeling the soil is key. If it's too dry then water it but if it stays damp for a few days then you shouldn't drown the poor things.
     Third, beetles. I have come to view beetles the same way an old lady views the pesky neighborhood kids who walk across her lawn; they don't belong and I'm not responsible for the way I act if I see them.
     According to the drawer of certificates and the amount of chords I'll be wearing when I graduate from college, I'm perfectly capable of keeping a garden without killing it. I know this is going to be more difficult than the small herb garden on the deck but I'm mentally prepared for this.
     I think.